Whole Health and Wellness

Whole Health and Wellness

Inspiring healthy living from the inside out

  • Home
  • About
  • Recipes
    • Salads
    • Meal ideas
    • Sweet Tooth
    • Smoothies
    • Snacks
    • Sauces and condiments
    • Dairy Free Milk
  • Health Spotlight
  • Blog
  • Contact
  • Search

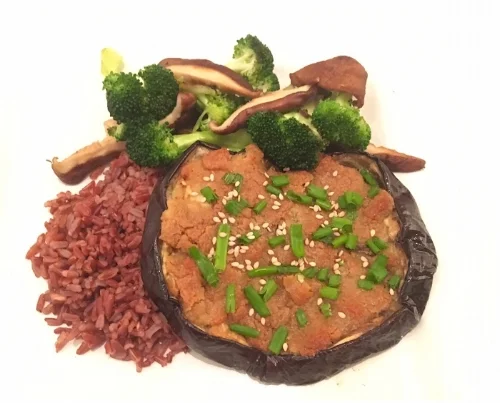
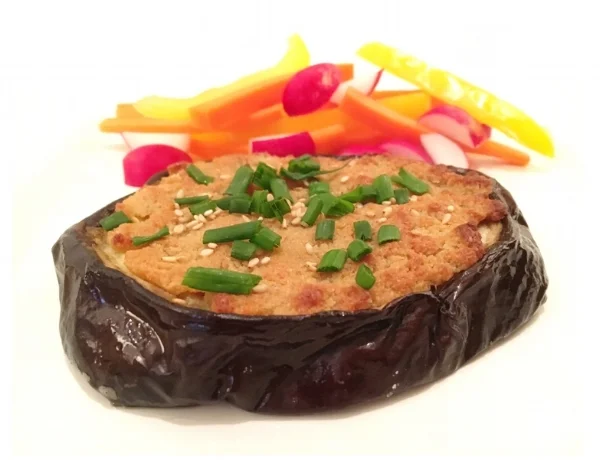
Sesame, Miso & Wasabi Crusted Eggplant Steak

January 03, 2017 by Heather Obasare

This super easy meal was inspired by my sister during my most recent trip to Australia. She is a wonderful creative cook and when she served me this dish I fell in love. When I got back home I experimented with her recipe, playing around with the ingredients and deciding to add wasabi for an extra kick. Saying that, the wasabi flavor in this recipe is very mild so if you want a bigger wasabi kick you can experiment adding more and see how it goes! I am all about playing around with recipes to adjust to your taste/food items available. Get creative! 

This is delicious served with veggies, brown rice or just eaten on its own as a snack. So here's how its made:

Cooking time: 30-35 mins

Prep time: 5 mins (plus additional 30 mins to allow eggplant to sweat)

Ingredients:

2 slices of large eggplant, sliced approximately 3/4 inch (2cm) thick. *if you are using a smaller/medium sized eggplant you can increase the number of slices to 3 or 4, depending on size. 

2 tablespoons tahini

1 1/2 teaspoons miso paste (any colored miso paste is fine)

1/2 teaspoon wasabi paste

2 teaspoons water

1/2 teaspoon salt

     Optional for topping:

1 teaspoon toasted sesame seeds

Chopped chives

Directions:

Sprinkle salt over both sides of the eggplant slices, and allow to sit for minimum of 30 mins to sweat. While eggplants are sweating, preheat oven to 400 degrees F (204 degrees C)

Once eggplants have sweat, pat the slices with a paper towel or cloth to soak up excess liquid. 

Rub both sides of the eggplant with a small amount of olive oil and place on a baking tray. Bake for 15 mins and then turn slices over and bake for a remaining 5 mins. 

While eggplant is baking, prepare the topping by mixing the miso paste, tahini, wasabi and water together. 

Remove eggplant slices from the oven. Divide the topping evenly amongst the slices and press it down to cover the top of the eggplant slice. * it can be sticky so wetting your fingers before pressing the paste down can assist with this process. 

Return eggplant to the oven and bake for a further 10-13 mins, or until topping has turned golden brown. 

Top with sesame seeds and chopped chives or whatever garnish inspires you!

Serve and enjoy!

January 03, 2017 /Heather Obasare
Comment

Chickpea Nuggets

January 31, 2016 by Heather Obasare

Well, after several attempts at these little healthy meatless nuggets, I finally worked out a recipe I'm happy with. These are easy and quick to make and taste great too! Here's how to make them.

Prep time: 10 mins

Cooking time: 6-7 mins

Makes 10-12 small nuggets or 6-7 larger nuggets

Ingredients:

1 cup cooked chickpeas

1 egg

2 medium cloves garlic

3 tablespoons extra virgin olive oil

3 tablespoons chickpea flour (if you don't have this you can substitute a different flour)

1 low sodium veggie stock cube (if you don't have a low sodium stock cube, use 1/2 a regular one and adjust salt quantity to taste)

1 1/2 tablespoons dried parsley flakes

1 teaspoon onion powder

1/2 teaspoon salt

1/3 cup panko bread crumbs 

2 tablespoons coconut oil

Method:

Place the chickpeas, egg, garlic, olive oil, parsley flakes, onion powder, salt and stock cube into a food processor or high speed blender. Process until smooth.

Remove mixture from the food processor and place in a bowl.  Add the flour and stir to combine. 

Place panko crumbs onto a plate. Scoop up a small amount of mixture (about a tablespoons worth) and place into the crumbs. Once coated in the crumbs, mold into the shape of a nugget. Repeat with remaining mixture. (This part is pretty sticky- it can help to wet your fingers before scooping up the mixture).

Heat coconut oil in a large frying pan on medium-high heat. Once heated, place the nuggets into the pan and fry until golden brown. Flip over and continue to cook until golden brown on both sides. Remove from the pan and place nuggets onto a paper towel to absorb any excess oil. 

Serve with ketchup, tzatziki, greek yoghurt or any other sauce of choice... enjoy! 


January 31, 2016 /Heather Obasare
Comment

Low Carb Gnocchi

November 16, 2015 by Heather Obasare

With this recipe you get all the deliciousness of gnocchi but with fewer carbs. Win! Heres the recipe:

Serves 2-3

Prep time: 20 mins

Cooking time: 12-15 mins

Ingredients:

1/2 head of cauliflower

1 cup almond meal

1 1/2 cups of flour + extra flour for rolling

2 egg yolks

1/2 teaspoon salt

2 teaspoons olive oil

Directions:

1) Remove the stem from the cauliflower and discard. Chop the cauliflower into smaller sized pieces and place the pieces into a food processor. Process until smooth. Depending on the size of your food processor you may need to do this step in batches. If you don't have a food processor you can finely grate the cauliflower.

2) Heat the oil in a pan and then add in the cauliflower. Cook cauliflower on medium-high while stirring constantly for approximately 5-7 minutes, or until cooked through. Remove from heat and let the cauliflower cool slightly.

3) Once slightly cooled,  place cauliflower into a cheese cloth and squeeze tightly to drain the majority of the water. If you don't have a cheese cloth you can get creative- use a  clean pillowcase or another piece of cloth that can drain water through. 

4) Mix the drained cauliflower together with the almond meal, flour, salt and egg yolks. Separate mixture into smaller pieces for rolling. 

5) On a well floured surface, take a piece of the mixture and roll it with your hands to form a narrow log. Slice the log into small pieces- approximately 1 inch in length. Repeat for the remaining mixture. Press each piece of gnocchi down slightly with a fork. 

IMG_469412094.JPG

6) Bring a large pot of salted water to the boil. Place the gnocchi into the boiling water. Once gnocchi floats to the top, cook for a further minute and a half and then remove to drain. (if you only have a small pot, cook the gnocchi in several batches)

Serve with pesto, pasta sauce, olive oil + parmesan, or your own creation. Enjoy!


November 16, 2015 /Heather Obasare
Comment

Vegan Korean BBQ Pulled "Pork"

November 10, 2015 by Heather Obasare

Jackfruit is a wonderful plant based meat replacer for making pulled pork. If you don't have fresh jackfruit available you can find the cans in most asian grocery stores, or online.

If you are pressed for time you can replace the sauce in this recipe for a pre-made BBQ sauce and it will still turn out delicious! Just check the BBQ sauce ingredients to ensure it is natural & free from corn syrup or other unnecessary chemicals. Do the same for the below BBQ sauce ingredients too!  

Prep time: 10 mins

Cooking time: 15-18 mins.

Serves 2-4

Ingredients:

1 can of green jackfruit or about 10-12 medium sized chunks of fresh boiled jackfruit.

2 cloves garlic, finely chopped or crushed

1 tablespoon of grated ginger

1/4 cup finely diced green bell pepper (capsicum)

1/2 small or 1/4 large onion, finely diced

1 tablespoon coconut oil

For the BBQ sauce:

3 tablespoons hoisin sauce

2 tablespoons ketchup

2 tablespoons soy sauce

2 tablespoons honey (or switch to agave if strict vegan)

1 tablespoon rice vinegar

1/2 tablespoon sesame seeds

2 teaspoons asian chilli-garlic sauce

1 1/2 teaspoons toasted sesame oil

Directions:

1) Add all BBQ sauce ingredients to a bowl and mix until combined.

2) Place coconut oil in a frying pan. On high heat, sauté the onion and bell pepper for 2 minutes. Add the ginger and sauté for another minute and then add the garlic. Sauté until garlic becomes aromatic (approximately 1 minute). Add 1/2 cup water and then the jackfruit and BBQ sauce. Turn temperature to medium-high. Cook for approximately 4-5 minutes and then turn jackfruit pieces over. Cook for a further 3-4 minutes or until sauce has reduced and thickened. Remove from heat.

IMG_468881120.JPG

3) Using a fork, shred the pieces of jackfruit and then stir everything together.

Serve in a sandwich, with asian noodles or rice, in tacos, on top of veggies, with a salad or some other creative idea you come up with. Enjoy!


November 10, 2015 /Heather Obasare
Comment

Vegan Sweet Potato & Black Bean Tacos

November 05, 2015 by Heather Obasare

I decided to experiment with making vegan tacos and oh boy am I glad that i did! I completely fell in love with this recipe. It takes a little more effort to make the tortillas yourself but the deliciousness of home made tortillas really makes it worth the extra 10 mins of cooking.

This is one of those recipes you can use to impress a date, spoil a friend (or yourself) or convince someone that plant based diets are the best! 

Heres how it's done:

Prep time: 10-15 mins

Cooking time: 30-40 mins.

Ingredients:

For tortillas

1 1/2 cups quinoa flour

1/2 cup besan (aka garbanzo or chickpea) flour 

Extra flour for rolling

1/2 to 2/3 cup water

2 teaspoons olive oil

Pinch salt

For taco filling

1 1/2 cups sweet potato, diced into small pieces

1 1/2 teaspoon dried thyme

1 can black beans, rinsed and drained

1/2 spanish (red) onion, finely diced

1/2 cup green bell pepper (capsicum) diced

1 clove garlic, crushed or finely chopped

1 tablespoon tomato paste

1 teaspoon unrefined sugar

1/2 teaspoon cumin powder

1/2 teaspoon smoked paprika

Dash of cayenne pepper (adjust based on level of spice desired)

Salt & pepper

Olive oil

1/3 cup water

 3-4 tablespoons cashew parmesan

1/2 cup Avocado, Lime & Cilantro Créma

3-4 tablespoons toasted sunflower seeds

Cilantro leaves to garnish

Directions:

1) Preheat oven to 400 degrees F

2) Place diced sweet potato onto a tray & drizzle with approximately 3 teaspoons of olive oil. Sprinkle over thyme and season with salt & pepper. Place into preheated oven and bake for 20-30 mins until cooked through (time will vary based on size- I made my chunks small and it took 20 mins).

3) While sweet potato is roasting, heat 2 teaspoons of oil in a frying pan and add the diced green bell pepper and onion. Sauté for 2-3 minutes until onion starts to brown. Add chopped garlic and sauté for a further minute until garlic becomes aromatic.  Add in 1/3 cup water and the tomato paste and stir to combine. Add in the black beans, cumin, smoked paprika, cayenne pepper and sugar. Season with salt to taste. Let it cook for a further minute while stirring and then remove from heat.

4) To make tortillas: Add the flours, a pinch of salt and olive oil to a bowl. Slowly add in water while mixing. Stop adding the water as soon as mixture has reached the texture of dough. Divide dough into smaller, even sized balls (makes about 8, depending on the size you make your tortilla). Place the ball of dough onto a well floured surface and roll out into a round thin tortilla.

Note# as the flours are gluten free the dough does not stick together as well as gluten based flours. Roll carefully and be sure to be generous with the flour on the bench & the rolling pin. I use regular wheat flour for this step as it helps keep it together, however if you need gluten free then use a gluten free flour to roll as it will still work). 

5) Heat a pan to medium-high and add a drizzle of olive oil. Place tortilla onto the pan and fry  for 1-2 minutes until golden brown on one side. While it is frying, add a drizzle of olive oil to the top side. Flip over and cook for a further 1-2 minutes until golden brown. (You do not have to use oil for this step however I like the extra taste kick of the oil).

6) Evenly divide the black bean mixture amongst the cooked tortillas and then top with the sweet potato. Add on the créma and then sprinkle over the parmesan cheese and toasted sunflower seeds. Garnish with cilantro leaves and serve! 

There you have it- the deliciousness of a vegan taco! Enjoy!


November 05, 2015 /Heather Obasare
Comment

Thai Peanut Kabocha Squash Soup

October 12, 2015 by Heather Obasare

This is a delicious, healthy, vegan comfort food that my mum used to make for me any my siblings when we were kids. Even though I was not really a soup fan at the time, I always loved this one! Here's how its done:

Prep time- 10 mins to prep the veggies and about another 5-10 mins to blend it all together after cooking. 

Cooking time: 50 mins

Ingredients:

6 cups of Kabocha squash (or butternut) cut into medium sized chunks

2 medium onions, roughly chopped

6-7 cloves garlic, whole (you can also leave the skin on for roasting)

1 tablespoon dried or fresh thyme leaves

3 tablespoons olive oil

1 can of light coconut milk

1/3 cup peanut butter

3 cups of low sodium vegetable stock

salt & pepper 

Directions: 

1) Preheat oven to 400 degrees F

2) Place the chopped squash and onions onto a tray. Season with salt, pepper and thyme. Add olive oil and toss. Place the garlic cloves on the tray next to the squash. Cook for 30 mins and then remove from the oven. Toss the squash and onions and then return to the oven. Bake for a further 20 mins.

3) Once vegetables are roasted, remove from the oven and allow to cool slightly. Remove the skin from the roast garlic.

4) In 2 to 3 batches depending on blender size, blend the roasted vegetables together with the stock, coconut milk and peanut butter until smooth. (note: it doesn't matter if the proportions for each batch are not exactly even- just mix it all together at the end)

5) Once blended, season with salt and pepper to taste. Serve, and enjoy! 


October 12, 2015 /Heather Obasare
Comment
IMG_464819140 copy.JPG

Vegan Baked Sesame Tofu With Shoshito Peppers & Shiitaki Mushrooms

September 24, 2015 by Heather Obasare

Serves 4

Prep time: 10 mins

Cooking time: 25 mins

Ingredients:

1 1/2 cups black rice (you can also use brown as a substitute)

10-12 shoshito peppers

12-15 shiitake mushrooms

4 teaspoons coconut oil

2 teaspoons soy sauce

1/2 teaspoon sesame oil

1/2 teaspoon garlic powder

Sriracha sauce to serve (optional)

Salt & pepper

For the tofu: 

4 slices firm tofu

3 tablespoons coconut flour

1/4 cup coconut milk (The actual milk version, not the tinned coconut milk. You can also use any other milk of choice)

1 teaspoon of coconut butter (or coconut oil if you don't have the butter)

1/2 teaspoon sesame oil

3 tablespoons desiccated coconut

3 tablespoons sesame seeds

Directions:

1) Preheat oven to 400 degrees F

2) Wash the rice then put in a pot with 3 cups water. Let this come to a boil and then turn to low-medium heat and cover. Cook for 20-25 minutes or until cooked through.

3) Take the 4 slices of tofu and slice them into smaller segments to make sticks (approx. 1/2 an inch wide).

4) Place the coconut flour onto a plate. On a separate plate, combine the sesame seeds, desiccated coconut and a pinch of salt. Warm the milk slightly and then place in a bowl. Mix the coconut butter and sesame oil into the milk. (Milk needs to be warmed slightly so that the coconut butter mixes through without clumping).

5) Take a tofu slice and coat it in the coconut flour. Next, dip into the milk mixture and then finally into the sesame/coconut mix to coat. Repeat for all pieces of tofu. Grease a tray and place the tofu pieces onto this. Bake in the oven for 25 minutes.

IMG_464818750.JPG

6) While the tofu bakes, heat up 2 teaspoons of coconut oil in a pan. Add the shoshito peppers and salt and pepper to season. Fry for 2 minutes then remove from pan. 

7) In the same pan, heat up remaining coconut oil and then add the mushrooms. Add in garlic powder, soy sauce and a dash of sesame oil and fry until browned. 

8) Place the rice, peppers, mushrooms and tofu onto a plate. Squeeze on sriracha sauce and enjoy!


September 24, 2015 /Heather Obasare
Comment
IMG_464391651.JPG

Heirloom Tomato Pizza

September 19, 2015 by Heather Obasare

Ingredients:

Prep time: 10-15 mins

Cooking time: 30-35 mins

2 large or 6 small heirloom tomatoes, sliced

1 pre-made or homemade whole wheat pizza dough (or for a low carb version you can use the cauliflower crust recipe)

3 cloves of garlic

2 tablespoons olive oil

1 large or 2 small onions

1/4 cup red wine

2 tablespoons honey (Use an unrefined sugar if you want this to be completely vegan)

2 tablespoons of thyme, oregano & rosemary mixed

1 tablespoon dried shallot flakes

1/3 cup grated almond cheese

Salt & pepper

Directions:

1) Preheat the oven to 350 degrees F/180 degrees C

2) Roll out the pizza dough to form a thin base. Place onto a greased baking tray or a pizza stone

3) Chop the garlic into small pieces. Drizzle olive oil onto the pizza base and then spread it out evenly. Sprinkle the chopped garlic evenly over the top and then cook for 15-20 minutes, depending on width of your base.

4) While pizza base is cooking, thinly slice the onions and add them to a heated, oiled pan. Fry on high heat for 1 minute or until onion slices are slightly brown. Add in the red wine, 1/4 cup water and salt to taste. Cook until liquids have evaporated. If the onions need more time to soften once water has evaporated, add a small amount more. Once evaporated, add the honey and stir continuously until the onions have caramelized- approximately 2-4 minutes. Remove from heat. 

 6) Once pizza base is ready, remove from the oven and top with the caramelized onion. Place the tomato slices over the onions and then sprinkle on the herbs, shallot flakes, salt and pepper. Drizzle on a small amount of olive oil and then place the cheese on top. Return pizza to the oven and bake for 10-15 minutes, or until cooked.

Serves 4 


September 19, 2015 /Heather Obasare
Comment

Polenta Pie Crust

September 18, 2015 by Heather Obasare

This pie crust is a great alternative to pastry. Once made, you can fill it with your favorite savory pie fillings. 

Prep time: 5 mins

Cooking time: 65-75 mins

Ingredients:

1 cup polenta/cornmeal

3 cups water

1 tablespoon butter

1 tablespoon dried rosemary

2 tablespoons of nutritional yeast or grated parmesan cheese

1 teaspoon garlic powder

1 teaspoon onion powder

salt & pepper to taste

Directions:

For the crust:

1) Preheat the oven to 350 degrees F/180 degrees C. 

2) Place the stove onto high and bring the water to a boil in a medium pot. Gradually add in the polenta while stirring constantly with a wooden spoon. Turn the stove to medium heat and continue to stir the polenta for approximately 10-15 minutes until it becomes thick and a little challenging to stir. Mix in the remaining polenta crust ingredients. 

3) Place polenta mixture into a greased pie dish and spread out until it covers the dish evenly. Place the crust in the oven and bake for 50 minutes to an hour, or until the crust had hardened.  Use as the crust for your favorite savory pie or quiche recipe.

September 18, 2015 /Heather Obasare
gluten free, healthy, low fat, pie crust, healthy pie, healthy pastry, vegetarian, vegan, clean eating, pie, pastry, pastry alternative, wellness, health, clean, clean food, clean recipes, recipes
1 Comment

Vegetable Turnovers

September 17, 2015 by Heather Obasare

Prep time: 15-20 mins

Cooking time: 30 mins

Vegetable Turnovers

These veggie turnovers are super easy! You can alter the veggies you use based on taste. Other veggie options that would be tasty include kale, mushrooms, spinach, bell peppers/capsicum or broccoli. Also if you don't have tarragon then parsley, thyme, rosemary, sage or oregano would all work well. 

Ingredients:

1 whole wheat pizza dough (I use store bought, but you can make this yourself if you choose)

1/2 of a zucchini

1 ear of corn

3/4 cup green peas (frozen or fresh)

1 1.2 cups Butternut squash, diced 

1/2 of a small red onion

2 tablespoons of goat cheese (or a dairy-free cheese alternative if you want this to be vegan)

2 teaspoons of tarragon

1/2 habanero pepper thinly chopped (omit or adjust based on spice tolerance)

Salt & pepper to taste

Olive oil

Directions:

1) Preheat oven to 400 degrees F

2) Preparing the vegetables: Dice the zucchini into small pieces. Remove the kernels from the corn. Remove the skin from the squash and dice it into approximately 1/2 inch pieces. Slice the onion into small wedges. Crush/chop the garlic. 

2) Place the butternut squash pieces onto a tray. Coat with a small amount of oil and season with salt and pepper. Place in oven and roast the squash until it is soft on the inside and has a slight crispiness on the outside. 

3) While the squash is roasting, heat a small amount of oil in the pan. Fry the onion until it begins to turn slightly crispy- approximately 3-5 minutes. Add the garlic, habanero pepper, zucchini and corn and continue to fry until the vegetables are cooked through. remove from heat. Stir in the tarragon and goats cheese and season with salt/pepper to taste. 

4) Cook the green peas and then mash them slightly. 

5) Separate the pizza dough into 4 equal segments. Roll out each segment until approximately 4 mm in width. 

6) Once the squash is roasted, turn the oven down to 350 degrees F. Mix the roasted squash in with the zucchini/corn mix.

7) Divide the vegetable mixture into four equal parts and place onto the center of each piece of dough. Divide the peas and place them on top of the vegetables.  Fold the dough over and join the edges together with a fork.

8) Lightly spray or brush a baking tray with oil and place the turnovers onto the tray. Brush a small amount of olive oil on top of each turnover and then place in the oven. Bake for 30 minutes and then turn over and bake for a further 10 minutes (baking time may need to be adjusted based on your oven. Turnovers should be ready when the crust has turned golden brown). 

8) Serve with a salad or enjoy on their own!

September 17, 2015 /Heather Obasare
vegetarian, vegan, healthy recipes, clean eating, vegetable turnovers, vegetable pockets, nutrition, meal ideas, healthy meals, pizza dough, healthy pizza, wellness, squash, green peas, corn, tarragon, low fat, garlic, goats cheese, habanero, healthy, healthy living, healthy food
Comment

Grilled Vegetables with Ricotta & Tomato

September 17, 2015 by Heather Obasare

This is a super quick, healthy vegetarian meal you can pull together in under 10 minutes- great for people with busy lives who still want to make their own clean meals. Its basic, but tasty!

Ingredients:

1 medium sized zucchini

5 medium sized mushrooms

2 tablespoons toasted pumpkin seeds 

1/3 cup fresh ricotta cheese

Small bunch of Basil leaves- approximately 8-10 leaves

1 Roma tomato

Olive oil

Salt & pepper

Directions:

Slice the zucchini into 2 inch segments. Slice these segments lengthways to form narrow rectangle pieces.

Slice the mushrooms.

Cut the tomato into wedges.

Heat a small amount of oil in pan and layer the zucchini slices on the pan. Season with salt and pepper. Grill on either side until golden. Remove from the pan and add some more oil. Grill the mushrooms until golden and season with salt and pepper. 

Place the mushrooms and zucchini on a plate. Crumble ricotta cheese over this and then add the tomatoes.  Sprinkle the pumpkin seeds on top and garnish with basil leaves.

Note: This is the low carb recipe however if desired you could serve it alongside couscous, brown or wild rice, or quinoa... or whatever you feel inspired to add! 


September 17, 2015 /Heather Obasare
Comment

Mushroom, Lemon & Ricotta Pizza With Cauliflower Crust

September 17, 2015 by Heather Obasare

Prep time: 10-15 mins

Cooking time: 40 mins

Ingredients

Cauliflower pizza base:

I head of cauliflower

1 1/2 tablespoons olive oil

2 eggs

1 teaspoon garlic powder

1 teaspoon onion powder

1 teaspoon thyme or rosemary

Pinch of cayenne pepper (optional)

1 tablespoon nutritional yeast (can be substituted with 3 tablespoons of parmesan cheese)

Salt & pepper 

Pizza Topping:

3/4 cup fresh ricotta cheese

Zest from 1 small lemon or 1/2 a large lemon (be sure to not grate any of the pith or it will be bitter)

3 medium or 6 small mushrooms, sliced

1 tablespoon olive oil

Fresh or dried thyme- approximately 1 teaspoon

Directions

1) Preheat oven to 350 degrees F/180 degrees C. Finely grate the whole head of cauliflower or pulse cauliflower florets in a food processor

2) Heat the oil in a frying pan and then add the grated cauliflower, garlic powder, onion powder, thyme and cayenne pepper. 

3) stir continuously until the cauliflower has cooked through- approximately 5-7 minutes

4) remove from heat and let it sit until it has reduced to a warm temperature (i.e make sure the cauliflower isn't hot enough to cook the eggs when they are added). You can put mixture in the fridge/freezer if you wish to speed up this process. 

5) Add the eggs and thoroughly mix through.

6) Line a baking tray with parchment paper and lightly grease. Place the mixture onto the paper and spread out to form a thin pizza base. Bake for 25 minutes, or until the base is firm. 

7) While the crust is baking, heat the oil in a pan. Once hot, lay the mushrooms flat and evenly spread across the pan (if they don't all fit, fry them in 2 batches). Season with salt & pepper. Let the mushrooms fry on 1 side for 1 1/2 minutes and then start tossing them around until cooked- a further minute or two. Remove from heat.

8) Remove the crust from the oven once it has baked. Evenly sprinkle the ricotta cheese and lemon zest over the base. Place the mushrooms on top and then sprinkle on the thyme. 

9) Bake for a further 10 minutes. Slice, serve and enjoy! Serves 3-4


September 17, 2015 /Heather Obasare
Comment
Blog RSS